Crate to craft table to multi-functional desk. Check it out!

-Video located at bottom of blog-
If you have read my other blogs then by now you know my home is not Gigantic. That being said, I put a lot of thought and time into what I do with the space I DO have. We have three bedrooms, one of which was “empty” and I wanted to do something really creative with it. My first design idea was a workout/yoga room. We put up the large mirror and painted the walls a soothing green. Unfortunately, the room didn’t get used that much for that purpose so it was time to redesign.
One thing I have come to realize is that even though you may be in love with the idea of a space being used in a particular way if it never gets used for that purpose then it is time to let go of that idea and find a new one! What is the point of having a room that just sits there unloved?
The room I am working with is 9’x10′ so that does NOT leave much room for your mind to go wild. But it is enough room for a ….CRAFT ROOM. Behold the second design idea (notice how I am counting ? lol). I could not for the life of me find any craft room furniture that had the look/storage/tabletop space I was looking for along with being the right size. So I decided to build my own.
I ran to Michael’s craft store to get ideas and as soon as I walked in the door I saw a pile of wood crates….Like Rain Man, I started doing equations in my head until I created an image of what I wanted. Then, like any normal person, I grabbed 16 of the crates. I looked crazy trying to figure out how to stack 16 crates to eliminate multiple trips..don’t do what I did…make the multiple trips!
Once I got home I figured out the layout I wanted. Since I wanted a wide tabletop I made the width equal to 2 crates side by side. If you want a narrower table then only use one crate. Along with this, you can use the crates Horizontally or Vertically. I also made my daughter her very own wall of crate furniture. For her desk, I stacked the crates horizontally since she is shorter. Watch my quick YouTube video (also located at the bottom of the page) to see all the different designs.
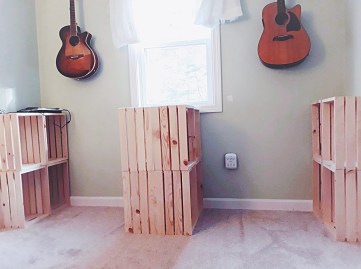
I decided to go the full length of my wall but you can make this whatever size YOU want. Keep in mind that the space between the crates needs to be wide enough to fit a stool or chair if you intend on sitting. Mine is designed for 2 chairs. Once you have the crates how you want them, secure them together with screws. I used cabinet screws. You need to screw the crates together everywhere they meet. Make sure your screws will not come out the other side of the wood…we don’t want anyone cutting themselves during craft time. See slides below.


For the tabletop, you can go to Home Depot or Lowes and get a piece of Spruce Pine Fur edge-glued Table board based on the size table you intend to build (See slides below). These will be in the “Hardwoods, shelving, plank paneling, Pine board isle.” I chose two 6 ft pieces that were 24 inches wide and 1/2 inch thick. I also grabbed 2-inch pine trim that was enough to cover the length of my table (this will be the back edge).


I wanted my tabletop to span the entire length of the wall, 10 feet, so I had to buy and use 2 boards. I cut one to 5 feet and one just shy of 5 feet so I had room to fit it in. I also attached the 2-inch piece of pine trim to the back of the tabletop to create a cleaner framed out look.

I am always changing things up until I find the absolute best design for a room. Therefore, I left my tabletops “floating”. They are not attached at all to the base. One major plus to this is you can just pop the top off and moved the crates. VOILA easy as pie. I recommend leaving the top floating.
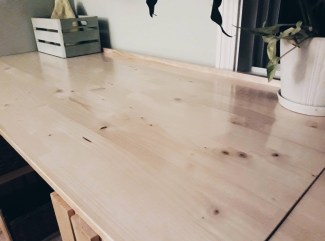
The next thing to do is sand and hand brush urethane if you want that smooth shiny finish. This takes quite a few applications followed by sanding. I recommend researching the best methods if you are not used to working with urethane. I used water-based and painted it on with a brush. I did about 6 applications of sanding then urethane because of my “minor” OCD and obsession with having it perfect and having ZERO bubbles. But it is completely up to you how many times you want to do it. Be prepared to dedicate a day or two to this.

I also gave the crates a quick sanding and urethane with a water-based spray can of urethane(2-3 cans). The crates will not be smooth like the tabletop unless you want to dedicate a lot of time to them as well. The urethane draws out the grain in the wood so you will need to sand…spray…sand….spray until you are satisfied. No one is going to notice the inside of the crates unless they are crazy and get down on their hands and knees to inspect them, so don’t kill yourself trying to get them smooth! I urethaned my crates before I screwed them together but that was somewhat a waste of time since I sprayed and sanded areas that will never see the light of day. So I would assemble the crates, screw them together and THEN sand and spray them. Unless you plan on using them individually in the future.
Once your crates are done and your tabletop is done go ahead and assemble your beautiful new piece of furniture!!! Look at that! Now you get to decorate the top with whatever you want. I used baskets for every single crate. look for baskets 11 x 9 x 7. You can add little coat hooks to the crates or fancy knobs to hang stuff on. The possibilities are endless.
Below- Slides of this design as a CRAFT TABLE


Below- Slides of this design as a DESK


This is truly an enjoyable DIY. Make sure to check out the video below to see how it all comes together!
Note: This was inspired due to Covid and me being forced to work from home permanently and my daughter now having to do hybrid learning. So if you are in the same boat this is a great way to work comfortably and to have your child right next to you while they do their work as well.